Project 10: Photo Stream with Mailgun
July 03, 2015 |
Over the years that I have been developing websites, I’ve had several occasions where I needed to receive emails programmatically and perform an action on the contents. If you’ve ever tried to read a raw email message, you know how complicated it can get. And with attachments and content boundaries, it never seemed to work out well.
Fortunately, Mailgun comes to the rescue. You can point your domain’s MX DNS records to their servers and do some pretty interesting things with emails. You can choose to match on different criteria of the email message and forward to another email address. You can also have Mailgun parse the email message and then post the message data to a URL.
In this tenth project of my 15 projects in 30 days challenge, I’m going to create an AngularJS and Node.js app that will handle incoming emails with photo attachments, and show a photo stream for each sender. This will demonstrate how easy it is to receive and process emails, including those dreaded attachments. I will also work with files in Node.js and use a second controller/view in AngularJS.
Mailgun
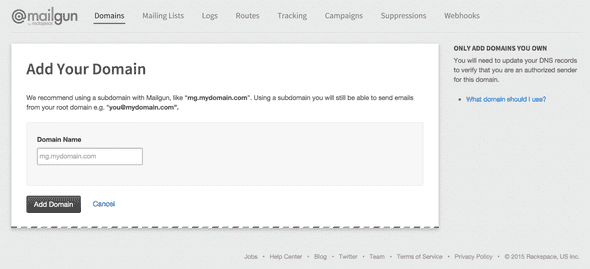
You’ll need to sign up for a Mailgun account and add a domain name or subdomain name. Part of the process adding a domain name includes changing some DNS settings so that mail is delivered to Mailgun.
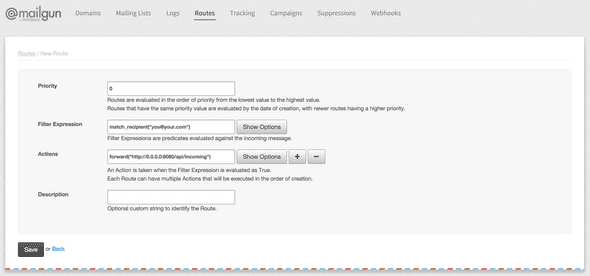
After you have your domain or subdomain pointing to Mailgun and shows an Active status, click on the Routes tab, and then Create New Route. We will specify a new route for the pics alias (pics@yourdomain.com). Change the IP address in the Actions field to point to where the Node.js app is hosted.
Setup
There are five files that are part of this project. The Node.js app, app.js, will handle the Mailgun webhook and also serve the AngularJS app and any pictures. The AngularJS app comprises of index.html and photostream.js, with two partial views photostream.html and userlist.html. userlist.html will show the most recent picture from each sender, whereas photostream.html will display all the pictures from a specific sender, in newest to oldest order.
// Filename: app.js

var PORT = 8080;
var MONGODB_ADDRESS = 'mongodb://127.0.0.1:27017/test';
var UPLOADS_DIR = 'uploads';

var express = require('express');
var bodyParser = require('body-parser');
var formidable = require('formidable');
var fs = require('fs');
var url = require('url');
var mongoose = require('mongoose');

var app = express();
app.listen(PORT);

mongoose.connect(MONGODB_ADDRESS);

var PhotoModel = mongoose.model('Photos', {
  email: String,
  title: String,
  caption: String,
  image: String,
  timeCreated: Number
});

app.post('/api/incoming', function(req, res) {
  var form = new formidable.IncomingForm();

  form.parse(req, function(err, fields, files) {
    var timeNow = new Date();

    for(var attachment in files) {
      fs.readFile(files[attachment].path, function (err, data) {
        var filename = fields.sender.replace(/[^A-Za-z0-9]/g, '')+fields.token+attachment;

        fs.writeFile(__dirname+'/public/'+UPLOADS_DIR+'/'+filename, data, function (err) {
          PhotoModel.create({
            email: fields.sender,
            title: fields.subject,
            caption: fields['stripped-text'],
            image: filename,
            timeCreated: timeNow.getTime()
          }, function(err, doc) {
            console.log(doc);
          });

        });
      });
    }

    res.send('success');
  });
});

app.get('/api/uploads', function(req, res) {
  var query = url.parse(req.url, true).query;
  PhotoModel.find({email:query.email}).sort({timeCreated: -1}).exec(function(err, photos) {
    if(err) {
      res.send([]);
      return;
    }

    var results = [];

    for(var i in photos) {
      results.push({
        title: photos[i].title,
        caption: photos[i].caption.replace(/\n/g, '<br />'),
        url: '/+'UPLOADS_DIR'+/'+photos[i].image,
        timeCreated: photos[i].timeCreated
      });
    }

    res.send(results);
  });
});

app.get('/api/users', function(req, res) {
  PhotoModel.aggregate([
      {'$sort': {'email': 1, 'timeCreated': -1}},
      {'$group': {
          '_id': '$email',
          'email': {'$first':'$email'},
          'url': {'$first':'$image'},
          'title': {'$first':'$title'},
          'caption': {'$first':'$caption'}
      }}
    ], function(err, docs) {
      if(err) {
        res.send([]);
        return;
      }

      var results = [];
      for(var i in docs) {
        results.push({
          email: docs[i].email,
          url: '/'+UPLOADS_DIR+'/'+docs[i].url,
          title: docs[i].title,
          caption: docs[i].caption.replace(/\n/g, '<br />'),
        });
      }
      res.send(results);
    });
});

app.use(express.static(__dirname + '/public'));

console.log('Application listening on port '+PORT);
<!-- Filename: public/index.html -->
<html ng-app="PhotoStreamApp">
<head>
<title>Photo Stream</title>
<script src="https://ajax.googleapis.com/ajax/libs/angularjs/1.3.16/angular.min.js"></script>
<script src="https://ajax.googleapis.com/ajax/libs/angularjs/1.2.1/angular-route.min.js"></script>
<script src="photostream.js"></script>
</head>
<body style="font-family:Arial">
## Photo Stream
<div ng-view></div>
</body>
</html><!-- Filename: public/photo_stream.html -->
Showing {{photos.length}} photo{{photos.length != 1 ? "s" : ""}} from {{email}}
<div ng-repeat="photo in photos" style="position:relative; margin-top:10px">
<img ng-src="{{photo.url}}" style="max-width:100%" />
<div style="position:absolute; bottom:0px; opacity:0.5; background-color:black; color:white; width:100%">
<div style="padding:0 20">
<div style="float:right">{{photo.timeCreated | date:"MM/dd"}}</div>
<h2>{{photo.title}}</h2>
<p>{{photo.caption}}</p>
</div>
</div>
</div><!-- Filename: public/user_list.html -->
<div ng-repeat="account in accounts" style="position:relative; margin-bottom:10px">
<a href="#/stream/{{account.email}}">
<img ng-src="{{account.url}}" style="max-width:100%" />
<div style="position:absolute; bottom:0px; opacity:0.5; background-color:black; color:white; width:100%">
<div style="padding:0 20">
<div style="float:right">{{account.email}}</div>
<h2>{{account.title}}</h2>
<p>{{account.caption}}</p>
</div>
</div>
</a>
</div>// Filename: public/photostream.js
var PhotoStreamApp = angular.module('PhotoStreamApp', ['ngRoute']);
PhotoStreamApp.config(['$routeProvider', function($routeProvider) {
$routeProvider.
when('/', {
templateUrl: 'user_list.html',
controller: 'UserListCtrl'
}).
when('/stream/:emailAddress', {
templateUrl: 'photo_stream.html',
controller: 'PhotoStreamCtrl'
}).
otherwise({
redirectTo: '/'
});
}]);
PhotoStreamApp.controller('PhotoStreamCtrl', ['$scope', '$http', '$routeParams', function($scope, $http, $routeParams) {
$scope.email = $routeParams.emailAddress;
$http.get('/api/uploads?email='+$scope.email).then(function(response) {
if(response.data.error) {
return;
}
$scope.photos = response.data;
});
}]);
PhotoStreamApp.controller('UserListCtrl', ['$scope', '$http', function($scope, $http) {
$http.get('/api/users').then(function(response) {
if(response.data.error) {
return;
}
$scope.accounts = response.data;
});
}]);// package.json
{
"name": "photo-stream",
"description": "Photo Stream application for Node.js",
"version": "0.0.1",
"private": true,
"dependencies": {
"express": "*",
"mongoose": "*",
"url": "*",
"body-parser": "*",
"formidable": "*"
}
}We need a place to store the pictures emailed. Create an uploads folder in the public directory. It is located in the public directory so that pictures in this directory can be served directly.
If you haven’t already installed MongoDB and Node.js, you can find the instructions in my other project.
To install the dependencies, you can run the following command:
npm installAnd to start the Node.js app
nodejs app.jsPhoto Stream
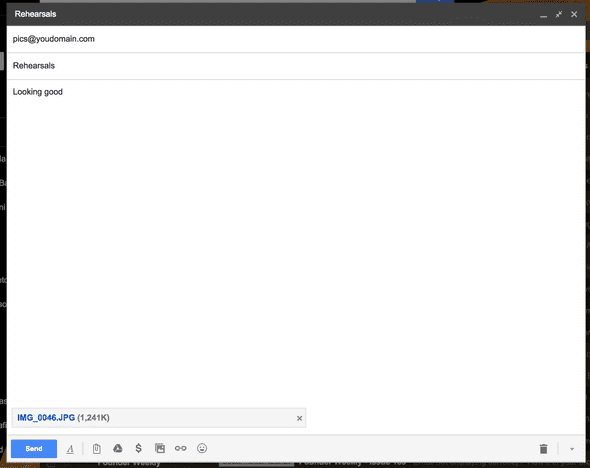
To add pictures into Photo Stream, email the pictures as attachments. Use the subject line as the title of the picture, and the body of the message as the caption for the picture. If you attach more than one picture to the email, each picture will get the same title and caption.
Open a browser window to where the AngularJS is hosted. The most recent picture for each sender is shown, with the corresponding title and caption. If you repeat the process with another email address, you should see two pictures, the most recent picture from each email address.
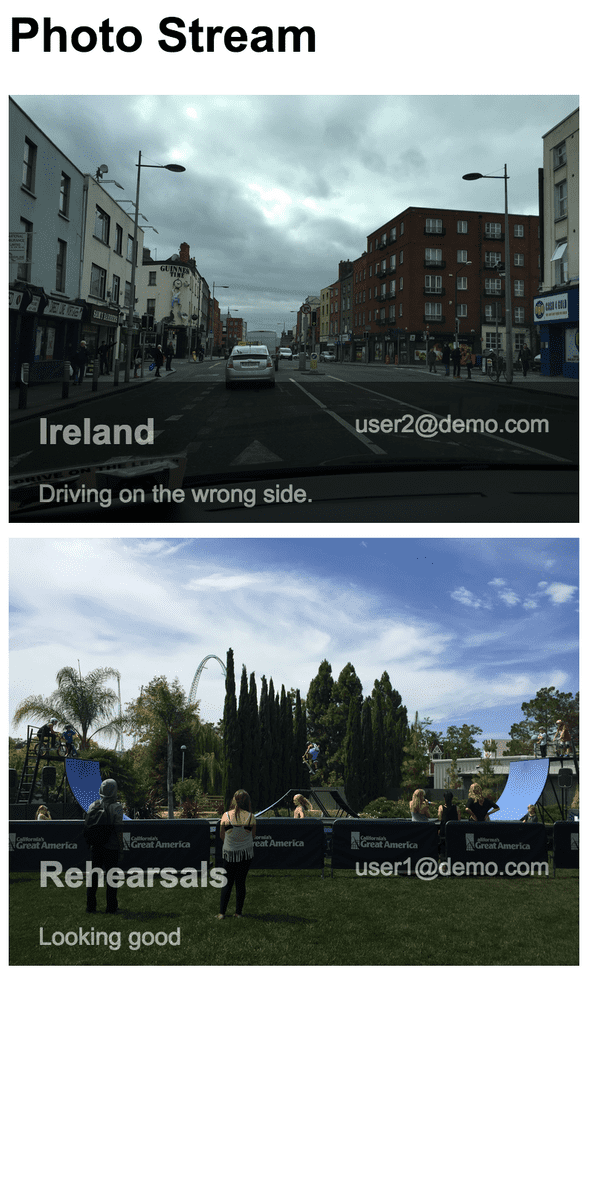
Viewing the latest picture from each sender is great, but how about viewing all the pictures a particular sender has sent. Click on the picture belonging to the sender, and a list of pictures sent by the particular sender will be shown, with the most recent picture on top.
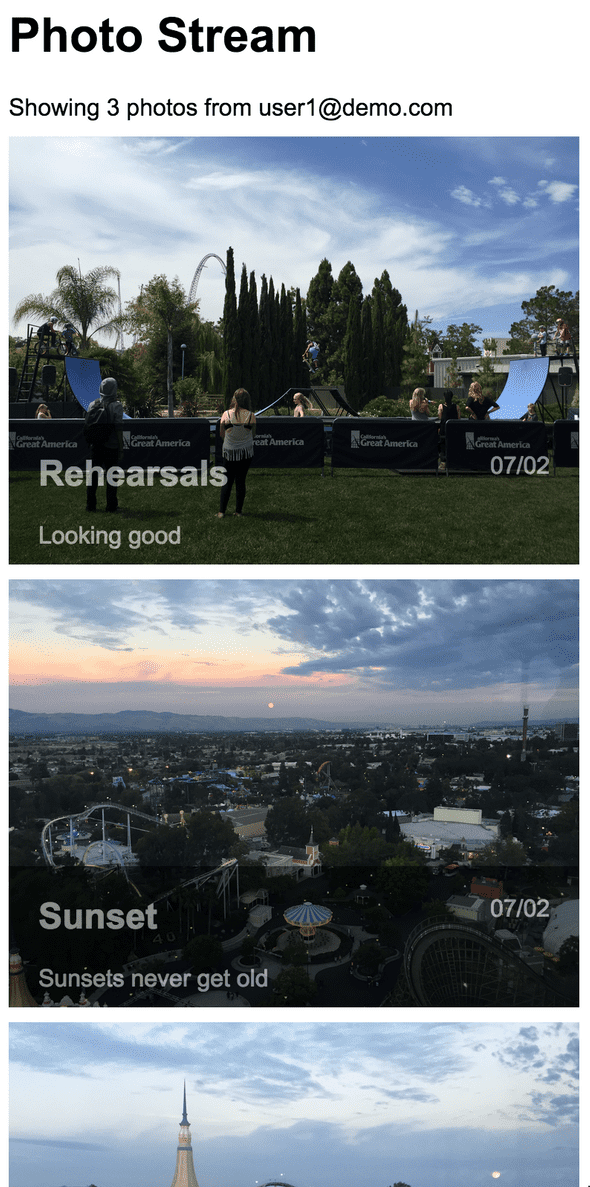
Did you notice what happened to the AngularJS app when you clicked on a picture? It loaded a second page! Using the AngularJS routing module, Photo Stream seamlessly switched over to a second controller and view. The URL should be something like /index.html#/stream/user1@demo.com. The email address that is being looked up is coming from the URL.
That’s it for this project. Here are some additional things that could be done:
- Email addresses may not be the best thing to show in our app. Either mask them or create usernames. If you create a username, it may be helpful to send an email to the user with their newly created username and a link to their profile. You could use SendGrid (project 5) to send the email.
- Photo Stream doesn't actually restrict the email attachments to being only images. Check the content type of the attachments, and reject non-images.
- Add another view with just one picture so it is easy to share a single picture.
- It may be useful to send an email response back after adding pictures to a user's Photo Stream. That way they can check them out directly.
- The user list and an individual's photo stream could become very long. Use pagination to limit the number of pictures loaded at a time.
Source Code
You can find the repo on GitHub.
Post Mortem
It was pretty cool how easy it is to handle emails and especially attachments through Mailgun. It wouldn’t take too much effort to enable a feature where you could just CC the Photo Stream email address when you email pictures to family members or friends.
This project also touched on routing in AngularJS, added a second controller, and added some grouping complexity in the MongoDB queries to find the latest pictures from users.
15 Projects in 30 Days Challenge
This blog post is part of my 15 projects in 30 days challenge. I’m hacking together 15 projects with different APIs, services, and technologies that I’ve had little to no exposure to. If my code isn’t completely efficient or accurate, please understand it isn’t meant to be complete and bulletproof. When something is left out, I try to mention it. Reach out to me and kindly teach me if I go towards the dark side. ?
This challenge serves a couple of purposes. First, I’ve always enjoyed hacking new things together and using APIs. And I haven’t had the chance (more like a reason) to dive in head first with things like AngularJS, Node.js, MongoDB, and Mailgun. This project demonstrated AngularJS, Node.js, MongoDB, and Mailgun.