JeanCarl's Adventures

Headlines Near Me with ClusterPoint and New York Times

July 21, 2015 | Projects

ChallengePost has been hosting eight online challenges this summer as part of a series they call Summer Jam. Their fifth challenge, Maps as Art, challenged hackers to “Reimagine the world around you and unleash your inner cartographer.” So I thought why not take the New York Times headlines and map them out.

But how could I determine the location of each headline. Ideally you would process the whole story and find locations. But that isn’t easy if there are a couple of locations mentioned. Fortunately, some stories have a dateline. A dateline starts off the story with the name of the location where the story is happening.

To make things really easy, the RSS feed has such a value as one of the elements in the item element. Score! However, how do you map San Francisco when the map is looking for latitude and longitude coordinates. Using Google’s Geocoding API, we can convert the location names into these coordinates.

Next, we need a place to store all these stories, so we’ll use ClusterPoint for our NoSQL database.

Finally, we need a map to place these stories onto. We’ll use Open Street Maps for a beautiful map interface.

Sounds like a plan!

ClusterPoint

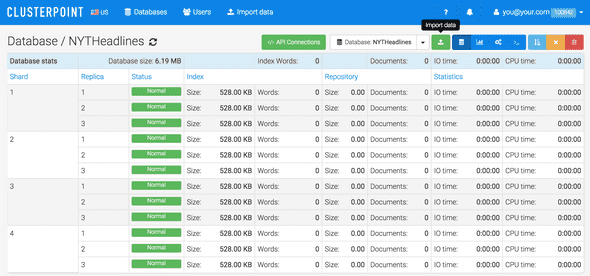
Sign up for a ClusterPoint account and create a database.

Photo

You should also create a public user with read only permission for the database. This will be used in the webpage, so it’s best to use credentials that aren’t super secret.

Google Geocoding API

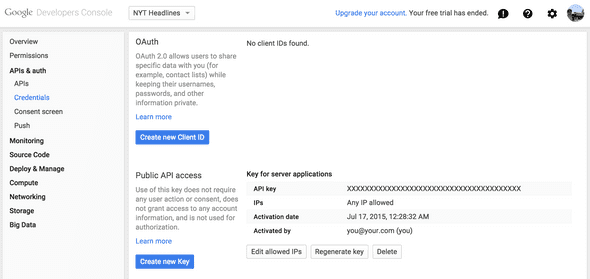
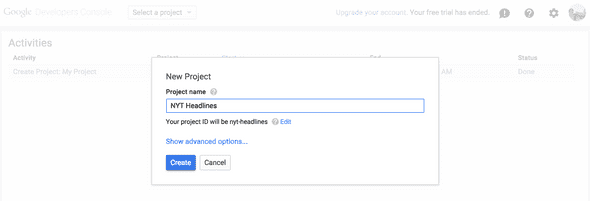
To convert location names into latitude and longitude coordinates, sign up for access to the Google Geocoding API. First register a new project.

Photo

And then create a Server API key.

Photo

Setup

This project consists of a Node.js application, app.js, and a webpage index.html that displays the map.

<!-- Filename: public/index.html -->
<html ng-app="OSM">
<head>
  <title>Headlines Near Me</title>
  <!-- Angular Material CSS now available via Google CDN; version 0.8 used here -->
  <style>
    @import "https://ajax.googleapis.com/ajax/libs/angular_material/0.9.0/angular-material.min.css";
    @import "https://api.tiles.mapbox.com/mapbox.js/v2.1.9/mapbox.css";
    @import "https://api.tiles.mapbox.com/mapbox.js/plugins/leaflet-markercluster/v0.4.0/MarkerCluster.css";
    @import "https://api.tiles.mapbox.com/mapbox.js/plugins/leaflet-markercluster/v0.4.0/MarkerCluster.Default.css";
    body md-toolbar {
      background-color: #3f51b5;
      color: rgba(255, 255, 255, 0.87);
    }

  </style>
</head>
<body layout="column" ng-controller="MainCtrl">
<md-toolbar class="md-whiteframe-z3">
  <div class="md-toolbar-tools">
    <span flex>Headlines Near Me</span>
  </div>
</md-toolbar>
<div id="map" class="md-whiteframe-z2" flex></div>

<!--Plugins-->
<script src="https://ajax.googleapis.com/ajax/libs/jquery/1.11.3/jquery.min.js" type="text/javascript"></script>
<script src="https://api.tiles.mapbox.com/mapbox.js/v2.1.9/mapbox.js"></script>
<script src="https://api.tiles.mapbox.com/mapbox.js/plugins/leaflet-markercluster/v0.4.0/leaflet.markercluster.js"></script>

<script>
  $(document).ready(function () {
    // Loading map from mapbox
    // Setting view to london
    L.mapbox.accessToken = "pk.eyJ1IjoiaW5zMWQzciIsImEiOiJmYTk5MjY4ZWMwNjVmNWVlZDdiZmQzOGE4ZWE2M2QxZCJ9.3aNjVwLZwEvRoZefs-vFvw";
    var map = L.mapbox.map("map", "ins1d3r.a901164f")
        .setView(current_location, 5);

    // Create the marker group again
    var markerGroup = new L.MarkerClusterGroup().addTo(map);

    $.ajax({
      url       : "https://api-us.clusterpoint.com/100842/NYTHeadlines/_search?v=32",
      type      : "POST",
      dataType  : "json",
      data      : "{"query": "<title>~=\\"\\"</title>" +
      "","list": "<lat>yes</lat>" +
      "<lng>yes</lng>" +
      "<url>yes</url>" +
      "<title>yes</title>"," +
      ""docs": "1000"}",
      beforeSend: function (xhr) {
        // Authentication
        xhr.setRequestHeader("Authorization", "Basic " + btoa("test@dothewww.com:test"));
      },
      success: function (data) {
        if (data.documents) {
          // Draw each marker
          for (var i = 0; i < data.documents.length; i++) {
            var marker = data.documents[i];
            if (marker.lat &#x26;&#x26; marker.lng) {
              drawMarker(marker);
            }
          }

          // Move view to fit markers
          if (markerGroup.getLayers().length) {
            map.fitBounds(markerGroup.getBounds());
          }
        }
      },
      fail: function (data) {
        alert(data.error);
      }
    });

    function drawMarker(story) {
      // Set marker, set custom marker colour
      var marker = L.marker([story.lat, story.lng], {
        icon: L.mapbox.marker.icon({
          "marker-color": "ff8888"
        })
      });

      var published = new Date(story.published);
      marker.bindPopup("<a href=""+story.url+"" target="_blank">"+story.title+"</a><br />"+story.location+"<br />"+published);

      // Add to marker group layer
      markerGroup.addLayer(marker);
    }
  });
</script>
</body>
</html>
// Filename: app.js

var DATABASE = '';
var USERNAME = '';
var PASSWORD = '';
var ACCOUNT_ID = '';
var GOOGLE_GEOCODING_API_KEY = '';
var PORT = 8080;

var cps = require('cps-api');
var xpath = require('xpath')
var dom = require('xmldom').DOMParser;
var request = require('request');
var stories = [];

var express = require('express');
var app = express();

var conn = new cps.Connection('tcp://cloud-us-0.clusterpoint.com:9007', 'DATABASE', 'USERNAME', 'PASSWORD', 'document', 'document/id', {account: ACCOUNT_ID});

function getLocation(location, callback) {
  request({
      url: 'https://maps.googleapis.com/maps/api/geocode/json',
      qs: {
        address: location,
        key: GOOGLE_GEOCODING_API_KEY
      },
      method: 'GET',
    },
    function(err, response, body) {
      var result = JSON.parse(body);
      console.log(location);
      console.log(body);
      callback(result.results[0].geometry.location);
    }
  );
}

function fetchStories() {
  console.log('Fetching stories');
  console.log(new Date());

  request({
    url: 'http://rss.nytimes.com/services/xml/rss/nyt/HomePage.xml',
    method: 'GET',
  },
  function(err, response, body) {
    var doc = new dom().parseFromString(body);
    var nodes = xpath.select("//rss/channel/item[category/@domain = 'http://www.nytimes.com/namespaces/keywords/nyt_geo']", doc);

    for(var i in nodes) {
      var title = nodes[i].getElementsByTagName('title')[0].firstChild.data;
      var guid = nodes[i].getElementsByTagName('guid')[0].firstChild.data;
      var pubDate = new Date(nodes[i].getElementsByTagName('pubDate')[0].firstChild.data);
      var location = '';

      var categories = nodes[i].getElementsByTagName('category');

      for(var j in categories) {
        for(var k in categories[j].attributes) {
          if(categories[j].attributes[k].localName == 'domain' &amp;&amp; categories[j].attributes[k].value == 'http://www.nytimes.com/namespaces/keywords/nyt_geo') {
            location = categories[j].firstChild.data;
            break;
          }
        }
      }

      if(location.length)
        stories.push({title: title, location: location, url: guid, published: pubDate.getTime()});
    }
  });
}

function addStory(story) {
  story.id = story.url;
  // TODO: Check if a id key already exists in database. If so, don't try adding it.
  // Currently, CP returns error code 2626 when id key is duplicated, and this is just ignored.

  conn.sendRequest(new cps.InsertRequest([story]), function (err, resp) {
     if(err &amp;&amp; err[0].code != 2626) return console.error(err); 
  });
}

// This fetches the stories on startup, and then at intervals.
fetchStories();
setInterval(fetchStories, 30*60*1000);

// Process through stories in a controlled manner to prevent hitting rate limits on Google's Geocoding API.
// Interval may be reduced to process more stories.
setInterval(function() {
  if(stories.length == 0)
    return;

  var story = stories.shift();
  
  getLocation(story.location, function(geo) {
    story.lat = geo.lat;
    story.lng = geo.lng;
    addStory(story);
  });
}, 1000);

app.use(express.static(__dirname + '/public'));
app.listen(PORT);

console.log('Application listening on port '+PORT);

Insert the ClusterPoint database, username, password, and account ID into the DATABASE, USERNAME, PASSWORD, ACCOUNTID variables in app.js. Insert the Google Geocoding API Key into the GOOGLEGEOCODINGAPIKEY.

Start up the Node.js app by running the following command:

nodejs app.js

Source Code

You can find the repo on GitHub.

Headlines Near Me

There are two parts to Headlines Near Me. First, the backend. The Node.js application will fetch the RSS feed from the New York Times. By default, this happens every thirty minutes. It adds each story to a queue that is slowly processed. By default, it processes one story per second to avoid hitting the rate limit. First, the location is converted into latitude and longitude coordinates. Second, it is then added to the ClusterPoint database.

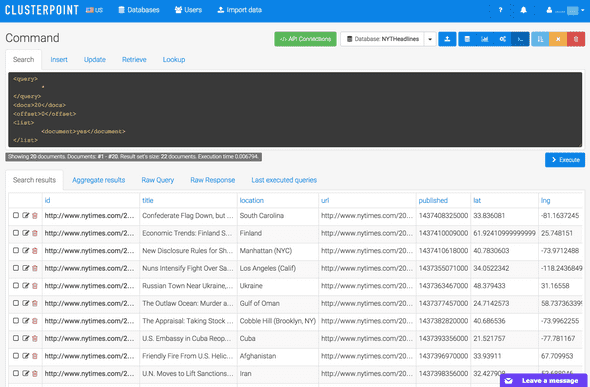
If you go back to the ClusterPoint database and run the default query, you should see a list of stories as they are processed and added.

Photo

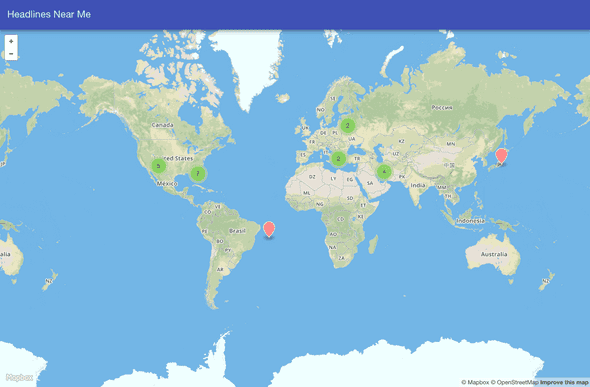
Great! We now have content to map. Open a browser to the application. The Open Street Maps map should load, fetch locations from the ClusterPoint database, and place pins on the map.

Photo

Clicking on a pin will display a window with the headline, location, and date the story was published. Clicking on the headline will take you to the New York Times website to read the story.

Post Mortem

I admit mapping headlines on a map isn’t all that interesting, per se. But when I saw what happened to the dots on the map, I realized the value in mapping headlines. First, you can see where the hotspots of news are. If a ton of stories are happening in a specific location, you may choose to focus in on that area, or, maybe, avoid that area until the activity quiets down.

Secondly, mapping stories also shows where nothing is being written about. Rather, where there may not be any coverage. Sometimes the media focuses too much on a specific area, leaving others totally in the dark. This could be used to keep journalism in check.
Wordsprout with HP Sprout and IBM's Text to Speech

July 20, 2015 | Projects

This weekend I attended Angelhack’s Silicon Valley hackathon held at HP in Sunnyvale. There were a handful of sponsors including HP, IBM, Respoke, ClusterPoint, SparkPost, and Linode. With so many sponsors, it was hard to choose what to make.

But as I walked into the hackathon, I just couldn’t walk past one table in particular without stopping. Four HP Sprout machines were sitting there waiting to be used. I had seen and played with a Sprout machine at another developer event. There was even a hackathon that focused on using that, but I had a prior commitment and couldn’t make it to the hackathon. So I was intrigued to play with it a little more. An HP evangelist immediately introduced himself and started demonstrating the unit.

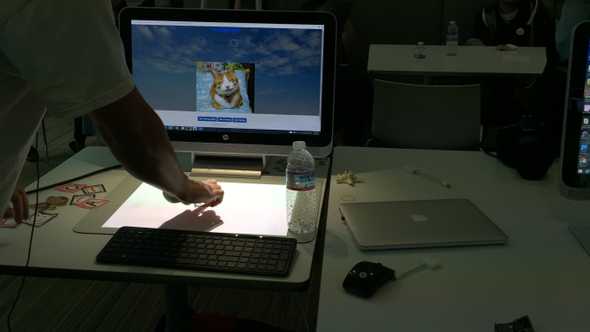
HP’s Sprout machine is a dual screen experience. The regular monitor is a touch screen. Above it is an arm that consists of a light and a camera, pointing down to a reflective mat. The second screen is projected onto this mat.

Objects projected onto this mat can be manipulated. If you place a physical object like a sea star onto the mat, you can scan it using the overhead camera and make it a digital object that you can then manipulate. There are programs on the Windows machine that let you manipulate physical objects you scan as digital objects in a variety of different ways.

HP Sprout

I started with the Object Tracking sample project for JavaScript.  This sample project demonstrated how to recognize objects and how to set ids for each scanned object.

Photo

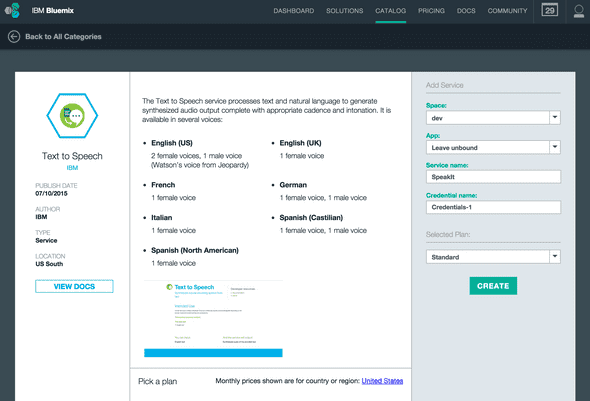
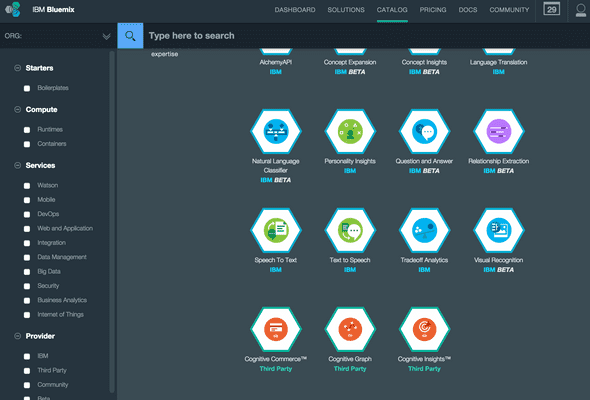
IBM Text to Speech API

I used the Text to Speech API from IBM Bluemix. You can find instructions on how to set that up in my 15th project of my 15 projects in 30 days challenge.

Photo

Wordsprout takes takes the word being composed and passes it to the Text to Speech API. The API returns a wav file that is played using the HTML5 audio tag.

Setup

This project can only run on an HP Sprout machine. It uses the JavaScript SDK adapter that connects to C# and C++ bindings which control the camera, capturing images and tracking where the objects move on the mat. There is a nw.exe executable file that starts up a Chromium application and launches both HTML pages.

After installing the JavaScript SDK replace screen.html and mat.html. Include the objects folder that contain the image assets for the words. Ideally, this folder wouldn’t exist and instead use remotely hosted images that represent any words that combinations of letters available could make.

<!-- Filename: screen.html -->
<!DOCTYPE html>
<html lang="en">

<head>
  <meta charset="utf-8">
  <meta name="viewport" content="width=device-width, initial-scale=1.0, user-scalable=no">
  <meta name="description" content="">
  <meta name="author" content="">

  <title>wordsprout</title>
  <link href="http//fonts.googleapis.com/css?family=Lato:100italic,100,300italic,300,400italic,400,700italic,700,900italic,900" rel="stylesheet" type="text/css">
  <link rel="stylesheet" href="https://maxcdn.bootstrapcdn.com/bootstrap/3.3.4/css/bootstrap.min.css">
  <link rel="stylesheet" href="https://cdnjs.cloudflare.com/ajax/libs/ladda-bootstrap/0.9.4/ladda-themeless.min.css">
  
  <!-- JQuery and Bootstrap are used in this example, but not required -->
  <script src="http://ajax.googleapis.com/ajax/libs/jquery/1.11.2/jquery.min.js"></script>
  <script src="https://maxcdn.bootstrapcdn.com/bootstrap/3.3.4/js/bootstrap.min.js"></script>
  <script src="https://cdnjs.cloudflare.com/ajax/libs/ladda-bootstrap/0.9.4/spin.min.js"></script>
  <script src="https://cdnjs.cloudflare.com/ajax/libs/ladda-bootstrap/0.9.4/ladda.min.js"></script>
</head>
<body>
<div><img src="wordsprout.png" style="max-height:60px"></div>

<div class="title">Points: <span style="padding:5px 20px; margin-left:30px; border:1px solid white" id="score">0</span></div>

<div class="word-text hide">
  <div class="instr" style="font-size: 30pt">Spell the word you hear.</div>
  <div class="instr hide" id="correct-word" style="font-size: 70pt; margin-top: 50px"></div>
</div>

<div class="word-pic">
  <div class="instr" id="word">Compose a word:</div>
  <div class=""><img id="pictoshow" src="" style="max-height: 500px"></div>
</div>
  
 <div class="jumbotron">
    <div class="container">
      <button type="button" class="btn btn-default pull-right" id="closeApp">Close</button>
      <p><button id="init" class="btn btn-primary btn-lg ladda-button" data-style="expand-right" onclick="initialize();">
        <span class="ladda-label">Initialize Object Tracking</span></button>
        <button id="button1" class="btn btn-primary btn-lg ladda-button" data-style="expand-right" onclick="addImages();">
        <span class="ladda-label">Add Training Images</span></button> <button id="button2" class="btn btn-primary btn-lg ladda-button" data-style="expand-right" onclick="start();">
        <span class="ladda-label">Start Tracking</span></button> <button id="button3" class="btn btn-primary btn-lg ladda-button" data-style="expand-right" onclick="stop();">
        <span class="ladda-label">Stop Tracking</span></button></p>
        Representation: <input type="text" id="letter" />
    </div>
  </div>
 
  <div class="modal fade hide" id="codeTracking" tabindex="-1" role="dialog" aria-labelledby="codeModalLabel" aria-hidden="true">
    <div class="modal-dialog">
    <div class="modal-content">
      <div class="modal-header">
      <button type="button" class="close" data-dismiss="modal" aria-label="Close"><span aria-hidden="true">&#x26;times;</span></button>
      <h4 class="modal-title" id="codeModalLabel">Code for Object Tracking</h4>
      </div>
      <pre class="modal-body" id="code_tracking">
      </pre>
      
      <div class="modal-footer">
      <button type="button" class="btn btn-default" data-dismiss="modal">Close</button>
      </div>
    </div>
    </div>
  </div>

  <div class="container">
    <div class="alert alert-danger alert-dismissible fade in" role="alert" id="capture_error">
      <button type="button" class="close" data-dismiss="alert" aria-label="Close"><span aria-hidden="true">&#x26;times;</span></button>
      <p id="error_message"></p>
    </div>
    <div class="row text-center">
      <h3 id="tracked-heading">Object Data</h3>
      <div id="outline-result" class="bg-info"></div>
    </div>
  </div>
  <audio controls preload="auto" id="audio">
    <source id="wavsource" type="audio/wav" />
  </audio>
<div id="message" style="font-size:36pt; text-align:center"></div>   
<script>
  var sprout = require("sprout");
  var wordnet = require("wordnet");
  var async = require("async");
  var responseAnswer = "";
  var score = 0;
  var IBM_TEXT_TO_SPEECH_ENDPOINT = "http://0.0.0.0:8080/api/speak?text=";

  window.checkAnswer = function() {    
    wordnet.lookup(responseAnswer, function(err, definitions) {
      if(definitions) {
        score++;
        
        $("#score").text(score);
        $("#pictoshow").attr("src", "objects/"+responseAnswer);

        document.getElementById("wavsource").src = IBM_TEXT_TO_SPEECH_ENDPOINT+encodeURIComponent(responseAnswer);
        document.getElementById("audio").load();
        document.getElementById("audio").play();
      } else {
        $("#message").text("incorrect");   
      }
    });      
  };

  var matHandle = sprout.openMat("mat.html");
  var l = Ladda.create(document.querySelector("#button1"));
  var spinner = Ladda.create(document.querySelector("#button2"));
  var spinner1 = Ladda.create(document.querySelector("#button3"));
  var spinner2 = Ladda.create(document.querySelector("#init"));
  var objCount = 0;
  var objName = "";
  var letters = [];
  var pieces = [];
  var onboard = [];

  $(document).ready(function() {
    $("#capture_error").hide();
    $("#tracked-heading").hide();
    $("#button1").hide();
    $("#button2").hide();
    $("#button3").hide();
    $.get("code.txt", function(data, err) {
      if(data) {
        $("#code_tracking").text(data);
      } else {
        showError("Failed to read text file.")
      }
    });
  });

  function initialize() {
    spinner2.start();
    $("#tracked-heading").hide();
    $("#outline-result").html("");
    sprout.initializeObjectTracker().then(function() {
      spinner2.stop();
      $("#outline-result").html("Object tracking initialized.");
      $("#button1").show();
      $("#init").remove();
    }).fail(function(e) {
      //error message
      showError(e.message);
    })
  }

  function addImages() {
    l.start();
    $("#tracked-heading").hide();
    $("#capture_error").hide();
    $("#outline-result").html("");
    sprout.capture().then(function(id) {   
      pieces.push($("#letter").val());        

      var r = sprout.addTrainingImages("o"+objCount, id);
      objCount++;        
      return r;
    }).then(function(data) {
      console.log(data);
      l.stop();
      //will return a boolean value to indicate whether or not image was added successfully
      if(data == true) {
        $("#button2").show();
        $("#button3").show();
      }
      $("#outline-result").html("Object captured successfully.");
    }).fail(function(e) {
      //error message
      showError(e.message);
    })
  }

  function display(data) {
    onboard = [];
    responseAnswer = "";
    
    for(var i=0; i<data.TrackedObjects.length; i++) {
      objectId = parseInt(data.TrackedObjects[i].Name.slice(1, - 1));

      onboard[objectId] = [Math.floor(data.TrackedObjects[i].PhysicalBoundaries.Location.X), objectId];
      onboard.sort(function(a, b) { return a[0] - b[0] });
    }
    
    var o = onboard.slice(0);
    o.sort(function(a, b) { return a[0] - b[0] });
    
    var t = "";
    for(var k in o)
    {
      t += pieces[o[k][1]];
    }
    responseAnswer = t;
    
    $("#word").text(responseAnswer);
    
    spinner.stop();
  }

  function start() {
    $("#tracked-heading").hide();
    spinner.start();
    $("#outline-result").html("");
    sprout.startTracking(display).then(function(data) {
      spinner.stop();
    }).fail(function(err) {
      //error message
      
      showError(e.message);
    })
  }

  function stop() {
    spinner1.start();
    sprout.stopTracking();
    spinner1.stop();
  }

  function showError(error) {
    l.stop();
    spinner.stop();
    spinner1.stop();
    spinner2.stop();
    $("#tracked-heading").hide();
    $("#outline-result").hide();
    $("#error_message").html(error);
    $("#capture_error").show();
  }

  $("#closeApp").click(function() {
    matHandle.close();
    window.close();
  });
  
  initialize();
  </script>
</body>
</html>
<!-- Filename: mat.html -->
<html>
<head>
  <link rel="stylesheet" href="https://maxcdn.bootstrapcdn.com/bootstrap/3.3.4/css/bootstrap.min.css">
</head>
<body>
  <div style="position:absolute; bottom:10px; width:100%; text-align:center">
  <input type="button" onclick="opener.checkAnswer()" value="Identify" class="btn btn-primary" style="font-size:36pt" /></div>
</body>
</html>

Source Code

You can find the repo on GitHub.

Wordsprout

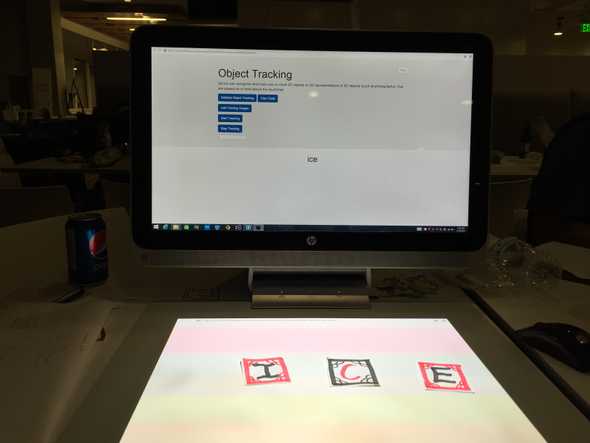
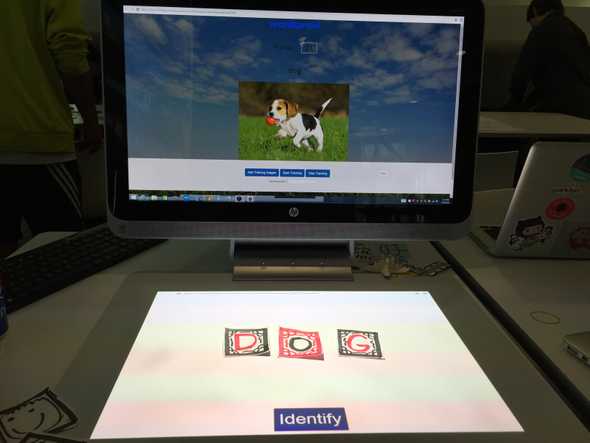
The objective of Wordsprout is to make words using letters on the mat (or pictures of objects) and to recognize them visually and orally. I drew the letters D, O, G on three pieces of paper, decorated them to be like playing cards, and scanned each one into the Object Tracking system. I associated each card with a value of the letter it had on it.

This is called adding training images. By training the system what each card is supposed to look like, and training Wordsprout what each card represents via the textbox input, Wordsprout gains the ability to recognize these objects when they reappear on the mat.

To start playing, start the tracking functionality by clicking on Start Tracking. This instructs Wordsprout and the HP Spout SDK to start looking for objects that it has been trained with. As the cards are placed onto the mat, the letters are placed in the same order on the page on the monitor. If you change the order of the cards, the letters on the screen change accordingly.

Photo

Clicking on the Identify button on the mat will trigger Wordsprout to check the constructed word. It uses the wordnet NodeJS module to check for a definition. If so, a point is awarded. A picture is loaded on the object that was spelled. And the audio representation of the word is played from IBM’s Text to Speech API.

Photo

Running out of time at the hackathon, I couldn’t find an API that would provide a reliable picture given a name of an object. I downloaded pictures of objects which the letters given would make.

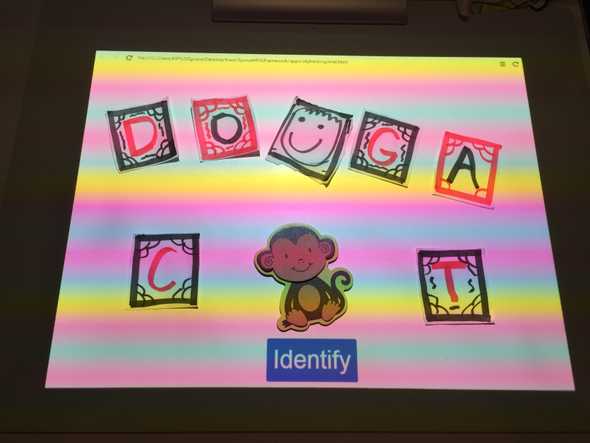
The other way to use Wordsprout is to scan objects like a monkey. I associated a monkey with the word monkey. When the piece was placed on the mat, Wordsprout displays a picture of a money and plays the word monkey.

By providing the textbox, I opened up a endless number of possibilities with the system. Scan any object, associate any name to it, and each time the object is placed on the mat, a picture is showed and audio representation of the object is played.

Another expansion that would be interesting to try out is to prompt the child to put a word or object on the mat by just playing the audio representation. For example, “Spell DOT” or “Place the monkey on the mat.” When the correct object is placed on the mat, a point is awarded.

Photo

Post Mortem

HP’s Sprout is a fascinating tool to enable hands-on learning. There are so many possibilities for children to engage with different types of activities using real manipulatives. There is research that show manipulatives add value to the learning process and engage different parts of the mind.

I also was really impressed that the JavaScript library worked so well. It was only recently released. The only thing our team and the Sprout team couldn’t figure out was how to scan multiple objects at the same time and split them up. This would enable putting letters D O G cards on the mat, and spelling DOG in the textbook in one scan instead of three separate scans. Wordsprout would split the letters up accordingly. In fact, I now wonder if OCR could be added to this process.

And it’s been awhile since I did an all nighter. It was worth it. A beautiful sunrise is always nice to see, even if blurry-eyed.

Photo

15 projects in 30 days recap

July 12, 2015 | 15 Projects in 30 days

When I started out to build 15 projects in 30 days, I had a simple goal in mind: learn AngularJS and Node.js with enough confidence that I could build whatever I thought up. 15 projects later, I have a basic understanding of AngularJS, Node.js, MongoDB, and a portfolio of prototypes that could be extended.

I communicated via text messaging quite a bit using Twilio, Tropo, and Nexmo. I captured moments in pictures using Yo and Mailgun. I drew out my ideas using Bitcasa and Firebase. I wrote, read, and spoke words using Evernote, AT&T’s Enhanced WebRTC, Box, and IBM’s Text to Speech. I counted my success with Parse and sent messages with SendGrid and PubNub. I guess it’s now time to head outside to enjoy a sunny day thanks to Weather Underground’s sunny forecast and head to my next hackathon with Eventbrite.  While I used all these APIs for free, I saved a bunch of change in my Venmo account.

Phew…take a breath for a second!

In total, I used seventeen APIs, used Node.js and AngularJS fourteen times and MongoDB nine times. I used HTML5’s canvas, video and audio features and learned a little bit about video, audio, phone calls, and money.

Having completed my 15th project, my heart has sunk a little. Don’t get me wrong, it’s been really fun to build things and it has been an awesome experience. I’m happy with the portfolio of “simple” hacks. But where do I go with this now? In another two days, I’m going to have that feeling of needing to build something, to blog about it, and to share my excitement and motivation. I guess I formed a habit.

As a developer who writes code everyday, the ability to express creativity and to build your ideas is really important. It isn’t just a profession, it’s what makes developers who we are. Developers build things for pure enjoyment.

So…the journey continues. Come back for Project 16!


Project 15: Hear It with IBM's Text to Speech

July 12, 2015 | 15 Projects in 30 days

If you’ve ever listened to a young reader read, you may have noticed the arduous task that that little brain is working through. English is a complex language, with many different pronunciations of the same word.

Techniques like sounding out words help some young readers learn new words. But there are some words that don’t conform. And which are in nearly every piece of content. They are called sight words. Recognizing these words quickly makes reading much easier and faster for beginning readers.

In my final project of my 15 projects in 30 days challenge, I’m going to use IBM’s Bluemix Text to Speech API to read a word aloud. The player clicks on the box with the matching word and scores a point.

IBM Bluemix

IBM Bluemix has quite a number of APIs and capabilities, but I’m going to use only the Text to Speech API in this project. Sign up for a Bluemix account.

Photo

Add the Text to Speech service.

Photo

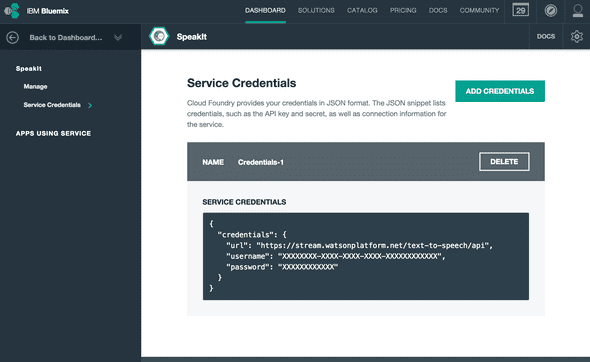
In the left-hand column, click on Service Credentials. Copy the username and password for the next step.

Photo

Setup

There are four files for this project. The Node.js app, app.js, will communicate with the Text to Speech API to get audio representation of the words. The AngularJS app, index.html and hearit.js displays the game.

// Filename: app.js
var BLUEMIX_USERNAME = '';
var BLUEMIX_PASSWORD = '';
var PORT = 8080;

var express = require('express');
var watson = require('watson-developer-cloud');
var url = require('url');

var app = express();

app.get('/api/speak', function(req, res) {
  var query = url.parse(req.url, true).query;

  var text_to_speech = watson.text_to_speech({
    username: BLUEMIX_USERNAME,
    password: BLUEMIX_PASSWORD,
    version: 'v1',
    url: 'https://stream.watsonplatform.net/text-to-speech/api'
  });

  var params = {
    text: query.text,
    voice: 'en-US_AllisonVoice', // Optional voice
    accept: 'audio/wav'
  };

  text_to_speech.synthesize(params).pipe(res);  
});

app.use(express.static(__dirname + '/public'));
app.listen(PORT);

console.log('Application listening on port '+PORT);
<!-- Filename: public/index.html -->
<html ng-app="HearItApp">
  <head>
    <title>Hear It</title>
    <script src="https://ajax.googleapis.com/ajax/libs/angularjs/1.3.16/angular.min.js"></script>
    <script src="hearit.js"></script>
  </head>
  <body ng-controller="HearItCtrl" style="font-family:Arial">
    <div style="float:right">
      Score: {{score}}
      <audio controls preload="auto" id="audio">
        <source id="wavsource" type="audio/wav">
      </audio>
    </div>

    <h2>Hear It</h2>

    <div style="clear:both">
      <div style="float:left; width:250px; height:75px; border:1px solid black; text-align:center;font-size:36pt" ng-repeat="word in wordSet" ng-click="checkAnswer(word)">{{word}}</div>
    </div>
  </body>
</html>
// Filename: public/hearit.js

angular.module('HearItApp', [])
.controller('HearItCtrl', ['$scope', function($scope) {
  var wordList = ['a', 'and', 'away', 'big', 'blue', 'can', 'come', 'down', 'find', 'for', 'funny', 'go', 'help', 'here', 'I', 'in', 'is', 'it', 'jump', 'little', 'look', 'make', 'me', 'my', 'not', 'one', 'play', 'red', 'run', 'said', 'see', 'the', 'three', 'to', 'two', 'up', 'we', 'where', 'yellow', 'you'];
  var audio = document.getElementById('audio');
  var wavsource = document.getElementById('wavsource');

  $scope.score = 0;
  $scope.attempt = 0;

  $scope.loadSet = function() {
    // Shuffle the word list.
    for(var j, x, i = wordList.length; i; j = Math.floor(Math.random() * i), x = wordList[--i], wordList[i] = wordList[j], wordList[j] = x);

    $scope.wordSet = wordList.slice(0,4);
    $scope.selectedWord = $scope.wordSet[Math.floor(Math.random()*$scope.wordSet.length)];
    $scope.attempt = 0;

    wavsource.src = '/api/speak?text=Click+on+the+word+'+$scope.selectedWord;

    audio.load();
    audio.play(); 
  }

  $scope.loadSet();

  $scope.checkAnswer = function(word) {
    if(word == $scope.selectedWord) {
      if($scope.attempt == 0)
        $scope.score++;
      
      $scope.loadSet();
    } else {
      audio.play();
      $scope.attempt++;
    }
  }
}]);
// Filename: package.json
{
  "name": "hear-it",
  "description": "Hear It game for Node.js",
  "version": "0.0.1",
  "private": true,
  "dependencies": {
    "express": "*",
    "url": "*",
    "watson-developer-cloud": "*"
  }
}

To install the Node.js dependencies, run the command:

npm install

And to start the Node.js app, run the command:

nodejs app.js

Hear It

Hear It is pretty simple to play. Load the index.html in the browser. Four random words from the wordList array are displayed. One of the words is spoken. The objective is to click on the correct word to score a point.

Photo

The next set of words is displayed when you click on the correct word. If you don’t get the correct answer on the first try, no points are awarded for that turn.

Photo

The audio is played via the audio HTML5 feature, which plays a wav file that comes from IBM’s Text to Speech API.

That’s it for this project. Here are some ways this project can be expanded:

  • Add full sentence examples to provide context to how the word can be used.
  • Add multiplayer capability (using Firebase, Project 14) where multiple players compete to click on the correct answer first.
  • Provide feedback in a report to a parent/teacher about which words the player struggles with.

Source Code

You can find the repo on GitHub.

Post Mortem

The Text to Speech API was easy to use and offered several voices. Text to Speech provides the ability for an app to present content in a way even illiterate users can understand. While this project was simple, it showed how audio can present an experience that works for many different audiences.

15 Projects in 30 Days Challenge

This blog post is part of my 15 projects in 30 days challenge. I’m hacking together 15 projects with different APIs, services, and technologies that I’ve had little to no exposure to. If my code isn’t completely efficient or accurate, please understand it isn’t meant to be complete and bulletproof. When something is left out, I try to mention it. Reach out to me and kindly teach me if I go towards the dark side. ?

This challenge serves a couple of purposes. First, I’ve always enjoyed hacking new things together and using APIs. And I haven’t had the chance (more like a reason) to dive in head first with things like AngularJS, Node.js, and IBM’s Bluemix. This project demonstrated AngularJS, Node.js, and IBM’s Text to Speech API.

Project 14: Pixel Play with Firebase

July 09, 2015 | 15 Projects in 30 days

Pixel drawing goes back to the good (tougher?) old days of programming where you drew graphics pixel by pixel. With a basic palette of colors, it is a fun challenge to draw things dot by dot on a small pixel canvas.

For this fourteeth project of my 15 projects in 30 days challenge, I’m going to build a real-time pixel drawing game that can be used by multiple players at the same time. The backend will use Firebase’s API to distribute changes made on the board to all connected clients.

Firebase

To get started, sign up for a Firebase account. Once you have an account, create an app. You will be given two URLs, a data URL which is what the app uses to communicate with Firebase to store and retrieve data, and a separate URL where you can access an application that you deploy to Firebase.

Photo

Setup

There are four files in this project, which make up the AngularJS app. There is no backend Node.js app for this project because Firebase takes care of the backend.

// Filename: public/pixelplay.js

var FIREBASE_ENDPOINT = '';

angular.module('PixelPlayApp', ['firebase', 'ngRoute'])
.config(['$routeProvider', function($routeProvider) {
  $routeProvider.
    when('/', {
      templateUrl: 'lobby.html',
      controller: 'LobbyCtrl'
    }).
    when('/play/:boardId', {
      templateUrl: 'play.html',
      controller: 'PlayCtrl'
    }).
    otherwise({
      redirectTo: '/'
    });
}])
.controller('LobbyCtrl', ['$scope', '$location', '$firebaseArray', function($scope, $location, $firebaseArray) {
  $scope.title = '';
  $scope.width = $scope.height = 8;
  
  var ref = new Firebase(FIREBASE_ENDPOINT);

  $scope.newBoard = function() {
    var row = [];
    for(var i=0; i<parseInt($scope.width); i++) {
      row.push(&#039;&#039;);
    }

    var data = [];

    for(var i=0; i<parseInt($scope.height); i++) {
      data.push(row);
    }

    $scope.boards.$add({title: $scope.title, data: data}).then(function(ref) {
      $location.path(&#039;/play/&#039;+ref.key());
    });
  }

  $scope.boards = $firebaseArray(ref.child(&#039;boards&#039;));

}])
.controller(&#039;PlayCtrl&#039;, [&#039;$scope&#039;, &#039;$routeParams&#039;, &#039;$firebaseObject&#039;, function($scope, $routeParams, $firebaseObject) {  
  $scope.colors = [
    {name: &#039;Red&#039;, hex: &#039;FF0000&#039;},
    {name: &#039;Blue&#039;, hex: &#039;0000FF&#039;},
    {name: &#039;Green&#039;, hex: &#039;00FF00&#039;},
    {name: &#039;Yellow&#039;, hex: &#039;FFFF00&#039;},
    {name: &#039;Purple&#039;, hex: &#039;800080&#039;},
    {name: &#039;White&#039;, hex: &#039;FFFFFF&#039;},
    {name: &#039;Black&#039;, hex: &#039;000000&#039;},
  ];

  $scope.currentColor = $scope.colors[0].hex;

  $scope.setColor = function(hex) {
    $scope.currentColor = hex;
  }

  var ref = new Firebase(FIREBASE_ENDPOINT);

  $scope.board = $firebaseObject(ref.child(&#039;boards/&#039;+$routeParams.boardId));

  $scope.click = function(row, cell) {
    $scope.board.data[row][cell] = $scope.currentColor;
    $scope.board.$save();
  }
}]);
<!-- Filename: public/index.html -->

<!DOCTYPE html> 
<html ng-app="PixelPlayApp">

<head>
  <title>Pixel Play</title> 
  <script src="https://cdn.firebase.com/js/client/2.2.7/firebase.js"></script>
  <script src="https://ajax.googleapis.com/ajax/libs/angularjs/1.3.16/angular.min.js"></script>
  <script src="https://cdn.firebase.com/libs/angularfire/1.1.1/angularfire.min.js"></script>
  <script src="https://ajax.googleapis.com/ajax/libs/angularjs/1.2.1/angular-route.min.js"></script>
  <script src="pixelplay.js"></script>
</head> 

<body style="font-family:Arial"> 
  ## <a href="#/" style="color:black; text-decoration:none">Pixel Play</a>
  <div ng-view></div>
</body>
</html>
<!-- Filename: public/lobby.html -->

<h2>Boards</h2>
<div ng-show="boards.length == 0">No games available.</div>

<div ng-repeat="board in boards">
  <a href="#/play/{{board.$id}}" ng-click="joinBoard(board)">{{board.title}} {{board.data.length}} x {{board.data[0].length}}</a>
</div>

<h2>New Board</h2>
Board title: <input type="text" ng-model="title" /><br />
Size: <input type="number" ng-model="width" value="1" min="1" max="10" /> (width) X <input type="number" ng-model="height" value="1" min="1" max="10" /> (height)

<input type="button" ng-click="newBoard()" value="New Board" />
<!-- Filename: public/play.html -->

<h2>{{board.title}} ({{board.data.length}} x {{board.data[0].length}})</h2>

Colors: <input type="button" ng-repeat="color in colors" value="{{color.name}}" ng-click="setColor(color.hex)" style="{{currentColor == color.hex ? "background-color: yellow" : "" }}" />

<table border="1" cellspacing="0">
  <tr ng-repeat="row in board.data">
    <td ng-repeat="cell in row track by $index" ng-click="click($parent.$index, $index)" style="width:50px; height:50px; background-color: #{{cell.length == 0 ? "FFFFFF" : cell}}">
      &#x26;nbsp;
    </td>
  </tr>
</table>

In pixelplay.js, add the Firebase data URL for your app to the FIREBASE_ENDPOINT variable.

You can access the index.html file directly on a webserver. However, Firebase can also host this application. In order to do this, install the Firebase command line tools by running the command:

npm install -g firebase-tools

Initialize the directory with Firebase:

firebase init

After you provide your user credentials, you’ll be asked which Firebase app you want to use for hosting. Lastly, specify the public directory, or document root, for the Firebase app. If everything works out, the app will be initialized successfully. To deploy it, run the command:

firebase deploy

Photo

You can access the app using the Site URL.

Pixel Play

You should see something like this when you visit the Site URL.

Photo

Before I continue, open another browser tab to point to the Firebase Data URL. This isn’t required, but it is a great way to visualize the data behind the scenes and see changes happen in realtime. Since no boards have been created, there is no data yet.

Photo

Back to the app, create a new board by entering a title. You can choose the dimension of the board, by default an 8X8 grid.

A new board will be created in Firebase, which you can view in the Data Dashboard. The browser will redirect to another view and load the board.

Photo

Copy the URL that the browser is redirected to after the board is created. It contains the board id that represents the board in Firebase. Open another browser tab, and visit this URL. You can visit it on any computer or device. Click on a color and click on a square on the board. The square turns that color, and all connected clients also automatically change. Continue clicking on squares to color a picture.

Photo

If you look at the Data Dashboard, you can see the board data has changed. If a cell is colored, its value is the HEX representation of the color.

Photo

That’s it for this project. This project is a great base for some expansions:

  • Add a timer and a name of a random (but drawable) object that participants should draw collaboratively together. It becomes a challenge if there is no communication to collectively decide how players can work together.
  • Limit colors that each participant can color with. Again, this can be a challenge to draw something together with limited communcations and abilities.
  • Add user accounts with names of participants so others know who's on the board. Add a status bar with who performed the last action.

Source Code

You can find the repo on GitHub.

Post Mortem

I have to say Firebase now tops my list of awesome developer tools. It is so simple to sync data across clients in a fraction of a second. On top of that, the Data Dashboard makes it easy to visualize the data and manage any data.

AngularFire also abstracts all the little details of integrating Firebase and AngularJS together.

15 Projects in 30 Days Challenge

This blog post is part of my 15 projects in 30 days challenge. I’m hacking together 15 projects with different APIs, services, and technologies that I’ve had little to no exposure to. If my code isn’t completely efficient or accurate, please understand it isn’t meant to be complete and bulletproof. When something is left out, I try to mention it. Reach out to me and kindly teach me if I go towards the dark side. ?

This challenge serves a couple of purposes. First, I’ve always enjoyed hacking new things together and using APIs. And I haven’t had the chance (more like a reason) to dive in head first with things like AngularJS and Firebase. This project demonstrated AngularJS and Firebase.